Sunday, December 18, 2011

Dear Santa....Graphic 45 Christmas Emporium

The Christmas Emporium collection by Graphic 45 has really inspired me to create!

Here is a layout I designed for the Winter 2011 issue of Canadian Scrapbooker magazine using this amazing collection of papers...

I haven't scrapped many photos from my childhood and knew it was time to use this precious pic of my brother and I on Santa's knee when I saw the gorgeous G45 papers.

I dearly love this photo...it captures that innocence of the Christmas season, the belief in Santa Claus and all the magic of waking up Christmas morning to find presents under the tree.

I remember that blue jacket and fuzzy white hood trim, and especially those white galoshes.  Do those kind of winter boots exist anymore?  You know the ones...you wear your shoes INSIDE of them! And there is a rubber buckle at the top to tighten? Ahhhhh...memories of simpler times....

But I want to make clear that I am NOT labelling this design as a heritage page or vintage layout...ha ha!  I'm not that old, am I??

The edges are punched by Martha Stewart, the cream ribbon running along the bottom is Harmonie, the fabric stars are  KI Memories, the sticker alpha is Fancy Pants, the chipboard scroll corners and tree are Dusty Attic, and the chipboard ticket border is Graphic 45.

Here are some close ups....
I created a quilted background by stitching squares of patterned paper.
This Dusty Attic tree is painted with Gold Metallic Adirondack paint and backed onto black Bazzill cardstock.
I "pounced" the gold paint dabber onto the chipboard to give it a more metallic appearance.
This scroll corner is also backed onto black Bazzill cardstock.  The square bling is Recollections (from Michaels).
The base of the wreath is made from 2 Tim Holtz medium rosette strips (Sizzix die).
The holly leaves are fussy cut from the Graphic 45 patterned paper and covered with Ranger Clear Rock Candy Distress Stickles.  After they were dry, I layered them onto the rosette wreath base, using Fabri-Tac as my adhesive (fast-drying liquid glue).....an essential for me!  To finish off, I added Stickles in "Xmas Red" to the holly berries and a red bow.  I coloured white seam binding ribbon with Fired Brick Distress Stain, crumpled and let dry. 

Here is a closer look....
The leaves curl as the Rock Candy Stickles dries.
My wonderful Christmas Emporium paper pack from Graphic 45 is almost empty...boo hoo!  But I will enjoy looking at them on this layout for many years to come :)

Wishing you all a joyous Christmas and wonderful holiday season!

Monday, December 12, 2011

December Sketchy Challenge

Is it mid-December?  Really?

And I haven't posted my Canadian Scrapbooker December Sketchy Challenge layout yet...oops! 

Here is Jill Sarginson's wonderful December sketch...

And here is my layout, using the TaDa Creative Studios "Frozen Tozen" collection...
The photos are BoyGenius skating for the first time on an outdoor lake at Jasper Park Lodge.


Those wonderful large white snowflakes are Ezee Pzee chipboard elements that I painted white....love their chipboard designs!

 I added Harmonie tile mosaics to the top and bottom borders for some dimension.
This collection comes with a super cute sticker sheet and journaling spots....
I did some paper piercing along the journalling spot and the round tag to coordinate with my Martha Stewart round the page border punch....
Even though I'm not a big fan of winter weather, I do love creating winter and Christmas pages!  As long as I'm indoors :)

If you have a moment, check out all the amazing offers and Giveaways over at Canadian Scrapbooker.  They are doing a daily Giveaway "16 Days of Sharing" AND a "Webisode 24" prize of a Sony Digital Frame/Printer!  PLUS...there are weekly prizes offered for "Why Not Win Wednesdays"!!

Yep, Canadian Scrapbooker has the Christmas Spirit!  Find them on Facebook too! 

Friday, December 9, 2011

GIVEAWAY WINNER....My Mind's Eye "Sunshine" Kit

Who knew Giveaways could be so much fun!

I love sharing my ideas and techniques with everyone here, and I so appreciate all the wonderful comments.

I just wish I could give EVERYONE a prize...but that would drastically reduce my Christmas shopping budget :)

Without further delay....I shall announce the winner of my 3rd Giveaway to celebrate the Christmas season, which I promise was chosen randomly....

Congratulations to......


RENEE!!

Renee and I met online awhile back on Scrapbook.com, and her blog LuvThisScrap is also an inspiration to me.  She will receive all the papers and products I used to created my layout "Adore."


I'm so happy to tell Renee that I'll be sending some "Sunshine" her way :)

Wishing you all a weekend filled with scrappy happiness!


Friday, December 2, 2011

I "Adore" My Mind's Eye

I tend to jump around a bit and use a variety of paper collections in the vast world of scrapbooking.  But lately I've been gravitating towards My Mind's Eye, the Lost & Found collections.

The papers are so versatile...elegant, classic, yet can suit almost any type of photo...

...even a photo of a teenager!  And that ranks high with me :)

Here is a layout I taught as a class at The Urban Scrapbook last month, created with the beautiful My Mind's Eye "Sunshine" collection.  This gorgeous distressed Prima wood frame was included in the class kit.
I "Adore" my daughter!
Here sits the lovely DramaQueen (DQ) ...and I snapped this during my annual fall photo shoot with the kids in front of our house in October.  Miraculously, she approved ONE photo from the many many that I shot.  And this was it!

I should add that this is probably the only photo she has given me permission to scrapbook in the past six months.

The feature technique for this layout is working with canvas, mainly the Prima Resistant Canvas (the clock, bird, foliage, and corner scrolls).  I coloured them in two ways:  Distress Stain and Distress Ink. (If you're not familiar with Prima Resistant canvas, they are sold in packages, and all these pieces and MORE came in one package! This particular set is called "Printery"...but there are about 5 other sets)
Here are some of the individual pieces out of the Printery set...a little hard to see the white embossed details on them.
A closer look...the butterfly is so beautiful with an embossed resistant script on it.

The tree trunk and branches are cut from Sticky Back canvas (Claudine Hellmuth) ....

 These pieces are inked with Vintage Photo Distress Ink, embossed, then inked again and backed onto chipboard.   I wrapped the tree in black tulle as well.
Canvas pieces on left are then attached to identical chipboard tree on right.
 The tree and branches are in pieces because I wanted to emboss them at the same time in the embossing folder (which is called "Burlap" by Tim Holtz).

 Here are some more close ups and details...
I handmade the spiral roses.  Just cut a small circle into a spiral, from the outside in, and roll around a skewer.
 The white details on the bird and clock are the "resist"....they will remain white when you ink the canvas.

The bird is painted with Broken China Distress ink.  This is a technique often used by Tim Holtz and Jennifer McGuire. Stamp the ink pad onto a piece of plastic or your splat mat and mist with water.  It becomes a watercolour.....then I painted the canvas bird with a fine tipped paint brush.  The legs and beak are painted with Frayed Burlap Distress ink.  Keep in mind that the watercolour bleeds...and will spread easily, so take care in painting the ink colour where you want it.

The canvas clock is altered with Vintage Photo Distress Stain.  The stains are a more concentrated colour and you just rub them onto the canvas pieces directly.
This corner flourish originally was white!
I coloured this canvas corner flourish with Black Soot Distress Stain.  Now, I should tell you that all these canvas pieces are adhesive backed....however, I learned that when I stained and inked them, the adhesive backing wasn't easily removed.  So I left the backing on and just adhered them to my layout with Fabri-Tac (a fast-drying liquid adhesive).

Leaves and foliage ....with some gold Stickles.
I coloured the flower/foliage canvas piece by painting it (the watercolour method described above) with Vintage Photo Distress Stain.

The dark brown polka dot leaves are coloured with Vintage Photo Distress Stain....see the difference?  Same colour...different application. 

The second technique I used on this layout are the tulle and wire elements:  the flower and the knotted border.  Super easy!

I discovered this tulle flower in a book called "Scrapbook Workshop"(edited by May Flaum) which was just published, and features a number of fantastic techniques by some very talented crafters.


This tulle flower is the handiwork of Iris Babao Uy...she is an artistic genius!
Tulle flower close up....with wire and beads centre.
 Simply gather about four pieces of tulle, 3 inches long and bind them in the middle with a piece of wire.  Leave one end of the wire longer for the front of the flower to make the beaded centre.  Add a few beads, bend the wire, add a few more, bend the wire...and so on.  Then fluff out the tulle into a round flower shape.
Knotted tulle and wire border.
The knotted border is also really simple to make.  Take any length of tulle (mine was about 12 inches) and tie it into knots at 2 inch intervals.  Then wrap small pieces of wire around the knots, securing the wire behind the knot.  When I tied the knots, I left the tulle in between the knots a little loose, not pulled tightly.
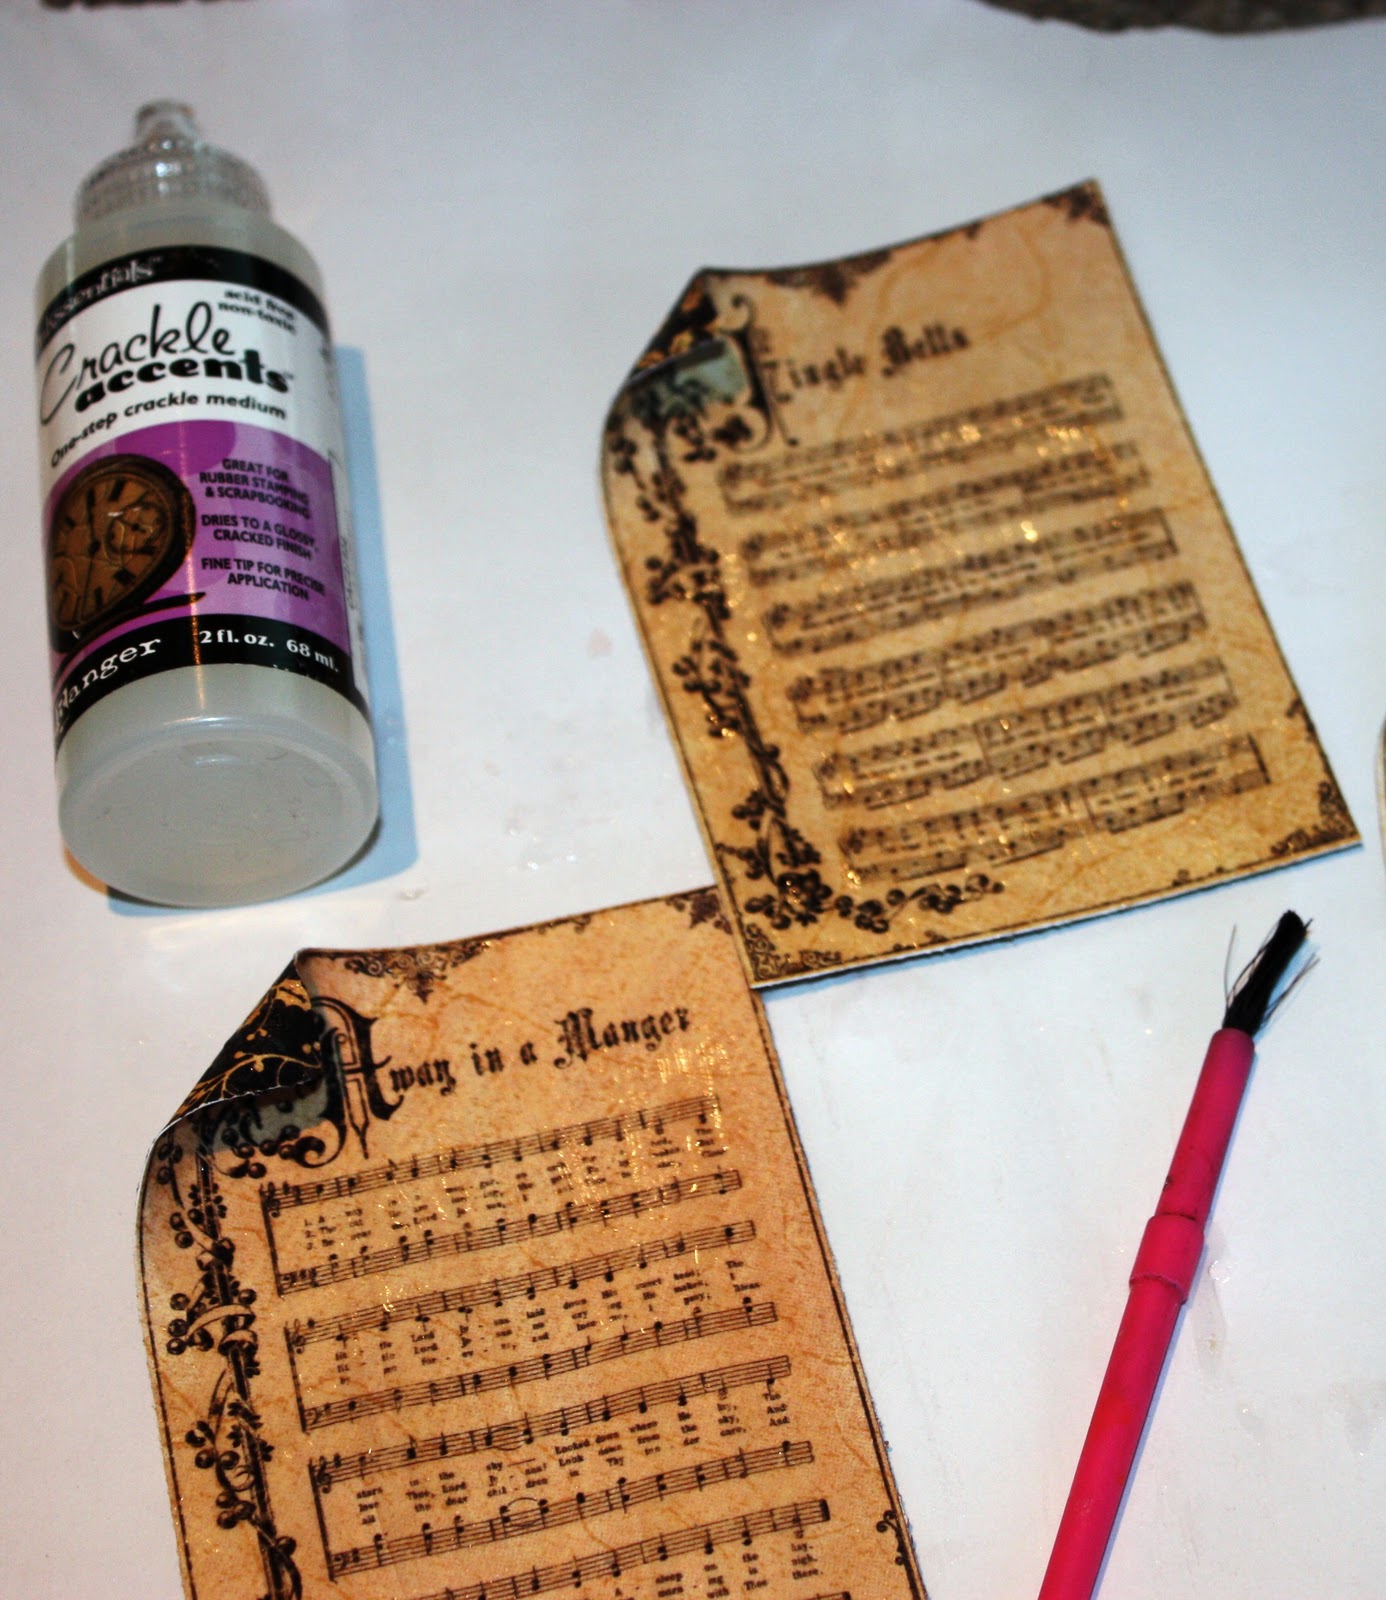
These leaves/branches are cut with a Sizzix die and inked with Vintage Photo Distress Ink.
Some of you might know that I have a thing for trees.  This is one of my favourites I've designed....with the textured canvas trunk and branches....and I love the leaves cut from the MME music sheet paper.

GIVEAWAY!!!!!!!
Because I ADORE all of you and your comments, I'm offering my 3rd GIVEAWAY....in the spirit of giving during this wonderful Christmas season.  If your name is drawn, you will receive a kit that has everything I used to make this layout (The frame, stains and inks are not included).

To be eligible to win, become a Follower and leave a comment.......the winner will be announced next week!


Friday, November 25, 2011

...And We Have Another WINNER!!!

Just a quick post to announce the winner of my second Christmas Giveaway....

This special someone will receive all the papers and embellishments I used to design my "Merry Christmas" layout, featuring the new My Mind's Eye Lost & Found Christmas collection, which I wrote about in my previous blog post last week....


Congratulations to....

ScrapbookerTink!!  A sweet little scrapbooking fairy who is good friends with Peter Pan :)

Next week I will have a new layout here...and another GIVEAWAY!

Until then...Happy Scrapping :)

Friday, November 18, 2011

Merry, Merry....My Mind's Eye

Exciting news, friends!  I have been invited to be Guest Designer for Canadian Scrapbooker magazine! This is a one year term, starting with the Winter issue, which will be released December 1. My photo and Bio is now posted on their Home webpage...so if you want to check it out, click HERE.

Quite a few of the projects I will have on my blog will also be featured in the magazine.  I am thrilled and honoured to be a part of the fantastic team behind the magazine...they are a very talented group of scrapbookers!

Today I am sharing a layout I completed for the monthly staff challenge at Urban Scrapbook, the store where I teach and design....plus, I used Jill Sarginson's sketch from the November Sketchy challenge over at the Canadian Scrapbooker website.

Here is Jill's awesome sketch....
...and here is my layout using the new My Mind's Eye Lost & Found Christmas collection...
We Wish You A Merry Christmas
The designer at Urban who creates these monthly staff challenges is Jan Hobbins...a truly gifted artist when it comes to scrapbooking and crafting. In our kit with these papers, she included the following which we were supposed to alter in some way:  a chipboard lamp post, 2 wood snowflakes, another snowflake and holly cut from acetate, and gold metal paper.

Here is how I altered these elements...
 I coloured the chipboard lamp post with Vintage Photo Distress Stain and Clear Rock Candy Crackle Distress paint.  Then I added a light behind the top lamp part by tracing it onto gold cardstock.
 I attached this gold cardstock piece behind the lamp with Glossy Accents.  It dries quickly and is great for adhering chipboard, grunge board etc.
The lamp wasn't shining brightly enough so I added some Gold Stickles right onto the gold cardstock.
(BTW, the lamp post, holly and snowflake were cut with a Tim Holtz Sizzix die)

The acetate holly you see on the lamp post is simply altered into a gold element using Gold Mixative Alcohol Ink.  It dries immediately and gives beautiful coverage on non-porous elements like plastic and transparencies.  I did the same with the clear acetate snowflake..
The snowflake on the left has the Gold Mixative on the back...hard to tell in this photo.
 The wood snowflakes from Maya road were altered with Clear Rock Candy Distress Crackle paint and then to highlight the "cracks", I rubbed on some beautiful Accent Powder by Harmonie....
The cracks just come to life with this Raspberry Accent Powder. 
 I used another handy tool for the powder....my finger tip :)

To alter gold metal paper from Spellbinders, I used a die cut scalloped element from the MME Christmas collection and traced it to make a whole scalloped circle.


 That purple doily in the photo is a steel die from Cheery Lynn...I used it to dry emboss the metal paper...


I used the rubber handle of my Cutterbee scissors to rub the metal paper on the doily die and emboss it with the design.  This wasn't my official plan...I just didn't clean up my workspace and the doily die was sitting there ....so the lightbulb went on over my head while I was looking at my metal paper! lol!

There probably is an official tool to emboss like this but I used what was sitting on my desk :)
And here's the finished metal doily!
 For those of you who don't use Photoshop or a program to alter photos, here is a handy trick to add an edge to a photograph....using paint.  I added Gold Metallic paint to my Christmas tree pic...
Place your photo on a piece of scrap paper and use any paint dabber.
Pounce or bounce your paint dabber along the edge of your photo to create a soft stippled effect.
I didn't let this dry on the scrap piece...I took it off so it didn't stick to the paper.
So easy...and it dries within minutes.

 Put it all together....and it's a Very Merry Christmas!

The tree in the photo is very special to me, not because it is the first artificial tree we bought together when married, but it is now decorated with beautiful Swarovski crystal snowflake ornaments. One design is released every Christmas, and a few years ago I told my husband how my BFF had been collecting them since the year of her daughter's birth. I wished I had done that. So for the past two Christmases, he had purchased all of the snowflake ornaments designed since the year of our son's birth, 1995, and gave them all to me :) I was moved beyond belief...he's a wonderful man and I'm so lucky.

These Christmas projects have brought me much joy and helped me appreciate the spirit of the season.....

So it's time for another GIVEAWAY!!!!

 If you are a follower and comment on this post, your name will be entered into a draw to win a kit with all of these goodies that I used to create this page!  If you live in Edmonton, these kits will be on sale soon at The Urban Scrapbook...so drop by!  The winner will be announced next week :)


Sunday, November 13, 2011

GIVEAWAY Winner!!!!!!!

First let me say I was completely overwhelmed by the fantastic response to my G45 Christmas cards post last week! Wow. I am so excited and grateful that both Beacon Adhesives and Graphic45 featured my blog on their Facebook pages! 
Christmas Cards....with Graphic 45 Christmas Emporium and Tim Holtz products
 I guess I'm glad I joined Facebook a few months ago :)

In fact, since my blog was hopping with new visitors and tons of wonderful comments, I updated that post to include a GIVEAWAY....a kit that includes everything you need to make those Christmas cards!
An extra special card kit I made up just for you, including instructions!
 I taught these cards in a class at Urban Scrapbook, twice in the last two weeks. So I made up an extra kit after I posted this Giveaway.

And the winner is............{drum roll........}....chosen from my "Followers" who left a comment.......

ANONYMOUS!!!!!!   who lives in Nowhere-ville, which is close to Unknownstown {just kidding}

The REAL winner is.................

Lisa :) !!!!!   {Big applause for Lisa!!!!!!} And honestly, her last name really is colon bracket :) ....better known at SMILE in cyber land. 

So Lisa, please contact me within one minute, or I shall be forced to draw another name. {Kidding again} Not to worry...I'll hunt you down online. Well, maybe I shouldn't use the word "hunt". 

BTW, even if you decide to remain Anonymous when leaving a comment, give yourself a fake name....so then you can be entered to win too, next time.

And the next time is coming up because.......I've also decided to post another Giveaway VERY soon to celebrate reaching 100 Followers.  {I'm still tickled by the word "Followers" lol!}


Stay tuned.....a Christmas layout including techniques will be posted later this week!

Sunday, November 6, 2011

Tim Holtz Meets Graphic 45

I suppose I am giving some of you a big SHOCK by designing Christmas cards.

If you're surprised about this, it's because you know I don't make many cards and have even been known to buy the Hallmark variety...Gasp!


I've always admired cardmakers who create spectacular pieces on such a small canvas.  So, when I was invited to teach a card class at Urban Scrapbook,  I thought, "Heck, yes! I'm going to give it a whirl!"

Using the new Graphic 45 Christmas Emporium collection and the Tim Holtz Mini Paper Rosette Sizzix die, I designed 5 cards and thought I'd share a few of the details with you.
The Graphic 45 Christmas Emporium paper pack...beautiful vintage papers!
 Here is the first card....
On Santa's Knee
The background is inked and embossed kraft paper, plus I used real Wood Veneer paper (Thin) from Creative Imaginations to design the mantle.
I used Fired Brick Distress Ink and the Prima Brick mask/stencil to alter the piece of kraft paper.
Then I embossed the "brick wall" with a Tim Holtz "Gridlock" embossing folder to create more texture...
After embossing, I lightly inked the raised design with Vintage Photo Distress Ink.
I also embossed the top of the wall with a Tim Holtz Wood Grain embossing folder...
...and inked the raised design again with Vintage Photo.
Close up of Wood Grain wall and wreath
The wreath is made with two medium rosette flower strips attached together.  I found it helpful to create a stable base for this wreath to sit on, so I made a "donut" out of scrap paper....
Here is the Paper rosette die I used on each card
The red ribbon is actually plain cream rayon ribbon (seam binding) coloured with Fired Brick Distress Stain.  Crumple it while still wet with the Stain and let dry in a crumpled ball to obtain the worn out vintage look.
Distress Stains come in so many different colours and allow you to transform any piece of seam binding!
The second card is called "JOY"...
I used 3 Tim Holtz dies to create this card....
I was a little sneaky with the "upon a time" alphabet and actually used the "Y" as the letter "J" because I didn't like the shape of the J in the original alpha.  Just cut off the arm of the Y and you have a J!! I should have been a rocket scientist...or a brain surgeon :)

The third card is named "Wishful Window" ....
The mother with children looking into a store window is an image from a piece of the Graphic 45 paper, which I fussy cut.  Then I framed the window with real Wood Veneer paper, inked with Walnut Stain Distress Ink.  The small mini rosette is accordion folded and adhered as an awning across the top of the window.
Off-white cardstock becomes swirly snow with a Tim Holtz "Swirls" embossing folder.
 The snow banks are cut and layered below the window. Then I added clear Stickles to the raised design to add some sparkle...
 This time I coloured the plain ribbon with Stormy Sky Distress Ink. 
To do this, you press the ink pad randomly on the ribbon (I didn't want solid coverage, so I missed some spots), put it in a plastic sandwich baggie, mist with water, then crumple and let dry.
Voila!  A lovely vintage blue ribbon is born!

The fourth card is "Christmas Carols"...

To age the carol music paper pieces, I used Crackle Accents and Walnut Stain Distress Ink.
With a paint brush, add a medium thick coat of Crackle Accents and let dry completely, about an hour or more.
When the Crackle is dry, ink the whole surface with Walnut Stain, mist with water and wipe off with a tissue or paper towel. The dark ink stays in the cracks, making them more visible.  Now you have beautiful vintage music paper!

The die cut elements are from the new Tim Holtz Festive Greenery Sizzix die.....
I cut the pieces from off-white Bazzill cardstock
....and then transformed them with a variety of Distress Inks....magical!
All the inked pieces and a small paper rosette are adhered to a piece of black cardstock and sprayed with Perfect Pearls "Heirloom Gold".
I love this Festive Greenery die...so pretty and versatile!
The fifth and final card is titled "O Jolly Christmas Tree"...
I wish my kids looked like this on Christmas day :)
The Christmas tree is made with 2 medium rosette strips, separated into pieces...
TIP:  Ink all the pieces before you assemble and layer into a tree.
Sookwang tape is the best adhesive to adhere the tree layers together.
Stack up your layers and adhere along the accordion folds.
Adhere the sides of the tree rosette pieces so they lie flat and you get a tree shape.
Also, I cut a 4" x 2" triangle shape to use as a base for the tree...adhering the rosette tree to a base will stabilize it and help it keep a nice shape. Oh, and the tree trunk is a little strip of real Wood Veneer paper inked with Walnut Stain.
Side angle of flattened sides of tree.

Fabri-Tac liquid adhesive by Beacon Adhesives is wonderful for this because it dries VERY quickly.

I also use Fabri-Tac as the adhesive for all the rosettes.  Some people prefer a hot glue gun, but I'm not a big fan of burning off my fingerprints :)

Hope this inspires you to make some Christmas cards....or at least start your shopping :)

GIVEAWAY!!!!!!!!!!!!
And my early Christmas present to you....if you comment on this post and are a "Follower" of my blog, you will be entered to win a kit to make ALL these cards!! I'd also love to hear which card is your favourite :)  Thanks for visiting!